Monday, September 2, 2013

Faux Granite Counters - Kitchen

This is my second faux granite counter top tutorial so it's not going to be nearly as in-depth as the first one...this is mostly just gonna be photos.  But, if you're interested in the whole process, check out my bathroom counter post too!  It's my most popular post to date... 

I loved the whole process and outcome of my faux granite bathroom counter so much, so I was happy to do it again in the kitchen.  The counters were an ugly, boring cream-colored Formica...and since I have a LOT of counter space I was stoked I could redo them all for a measly 60 bucks.  

I bought another Giani Granite Kit, but this time in Bombay Black.  I had already repainted the drab oak cabinets a light gray-ish/taupe color, and the rest of the colors in the kitchen were pretty light too, so I wanted some contrast.  I was a little nervous about going so dark at first, but I'm totally glad I took the plunge.... The counters are so gorgeous in person and for about a week afterwards I just kept walking into the kitchen to stare at them.  That's normal, right?

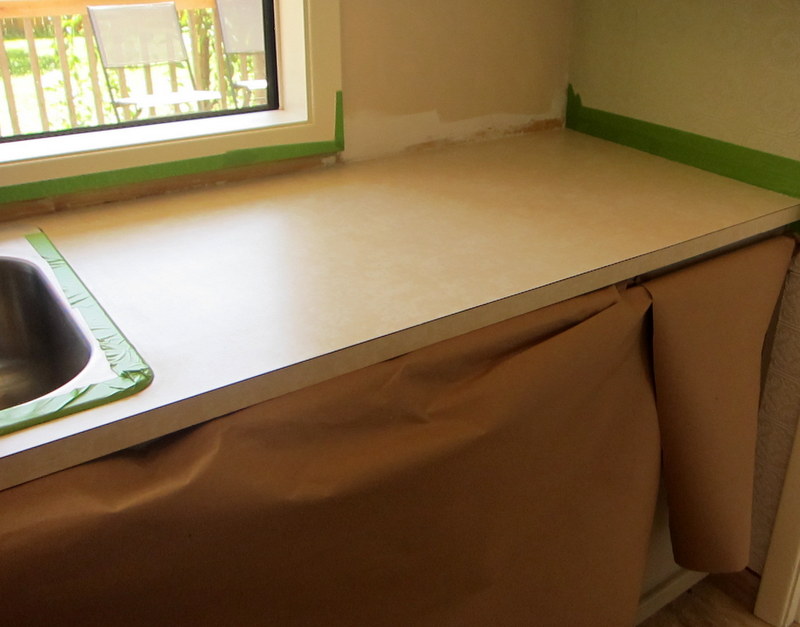
Prepping... I used leftover contractor's paper from my paper bag floors to protect my freshly-painted cabinets.  And I used FrogTape to protect some of the walls, the sink and the window trim...but since I was planning to add a tile blacksplash like I did in the bathroom, I didn't have to be careful everywhere.  Thank goodness, because I'm a messy do-it-yourself-er... 


Before I could primer the counters, I had to fill a couple of holes in the Formica... Giani recommends using sandable/paintable wood patch.  All I had to do was smoosh (yes, it's a word) some wood patch in my hands to warm it up, spread it on the holes with a puddy knife and let it dry.  I think it took an hour or so...and then I just sanded it smooth and level with the rest of the counter.  Easy.  


Primered counters.... These photos feel very sneaky.  I cropped out other parts of my kitchen that you are not allowed to see yet!


During sponging.  I know it looks like a really bad kid's art project at this point, but just keep going!  You won't regret it.... 


Okay, okay... I guess you're getting a sneak peak of my top-secret kitchen shelving anyway....  Apparently I forgot to take a picture of the whole kitchen in all its faux granite glory (I suck at this), so I'll do that later (after I clean it!) and add a photo of all the counters on here...


Ahhhh.... I love how shiny they turned out.  They even FEEL real... 


I also used black caulk around the stove and along the walls to give it a really seamless look.  Notice the textured wallpaper...post coming soon!


I couldn't be happier with how the counters came out... They look stunning in person and no one can believe that they're painted.  They are super glossy and multi-dimensional and expensive looking and I LOVE them.  


Gotta go...another DIY project awaits me.


Thursday, August 29, 2013

Paper Bag Floors?!

As you may have read in a previous post, I ripped up the ugly flooring in the bathroom only to find another layer of ugly flooring...and then I ripped up that layer to find yet ANOTHER layer of ugly flooring.  Kill me.  Lineloum glue has since been added to the things I will forever haaaaaate. 

During the demolition....


But it had to be done...and after many hours of scraping and picking and ripping and grunting and cursing and sweating, I won!  I had my heart set on Paper Bag Floors and I needed the bare, plywood subfloor to install it on.  If you haven't heard of paper bag floors yet, search Pinterest and you'll get dozens and dozens of pins.  It's super affordable (less than 100 bucks), looks fan-freaking-tastic and is incredibly durable.  Apparently, this blog post is one of the most popular references...and she goes into more depth than I'm going to, so check it out. 

I'm in LOOOVVVE with my floor.  I know I say that about everything, but it's true.  I love it.  It is so cool and so pretty and so durable...and if I can convince someone to rip up three layers of linoleum in the kitchen and laundry room, I'd install this flooring again in a heartbeat....

Okay, first step...prep, as always.  In my case, I probably spent more time prepping than I did installing the floor.  After I ripped up three layers of linoleum, I had to sand and sand and sand and sand the glue off the plywood so the floor was level and smooth-ish... I used heavy-duty 60-grit sandpaper with a palm sander.  It took forever and I complained a lot.  After I was completely done with sanding I vacuumed the entire bathroom really, really well to get rid of all the saw dust.  Saw dust and glue don't go well together! 

I ripped out the nasty rubber baseboard trim before I did this, but if you have baseboards you want to protect, make sure to tape them off well with FrogTape.  Or... You could just carefully remove them and replace them afterwards.  I'm sure that'd be a lot easier because this is kind of a messy job....

  • Brown paper - I bought this roll of contractor's paper at Home Depot for like 12 bucks and I have a TON left over.  I tried to find a smaller (wrapping paper-sized roll) at Fred Meyer in the mail/shipping section, but no such luck... But if I do this in the kitchen too, I'll have plenty of materials left.
  • Elmer's glue - Every blog and Pinterest post I read called for a GALLON of Elmer's glue...and after searching high and low for a gallon of the stuff with no success, I bought four 8 ounces bottles of it at Fred Meyer in the office supply section hoping it would at least get me started.  And I only used 2 of the 4 bottles!  Apparently none of the other bloggers were only doing a 25 square foot bathroom floor.  I was SO glad I didn't end up with a gallon of Elmer's glue...
  • Wood stain - this step is optional...you can leave the paper au natural or you can stain it with oil-based wood stain.  I stained my floor with Minwax Dark Walnut (about 7 bucks) and I love the way it turned out.  If/when I do the flooring in my kitchen I think I'll do a lighter color (because my faux granite kitchen counters are almost black) but this color looks fantastic in the bathroom.
  • Polyurethane - this was the most expensive item at $40+ but considering the overall cost of the flooring, you're still getting a fantastic deal!  Don't skimp on the quality of the poly... I bought this water-based flooring grade poly in semi-gloss. It dries fast, has no odor and the end result feels smooth and durable.
  • Lambskin block stain thingy... I don't know what this is really called, but it's basically a block of wood wrapped in lambskin and you attach it to a painter's extension pole.  It works just like a mop and it's used for staining large areas like decks.  I used it to mop on the wood stain and the poly.  You can also use something like this Shur-Line Deck Pad attached to a painter's pole.
  • Chip brush (3 inch) - used to cut in the stain and poly around the toilet, corners, etc. where the lambskin mop can't get to. 
  • A couple of paint tray liners for the wood stain.  That stuff will ruin your paint trays in a hurry!

Once you have all your materials, you're ready to get started!   

First step - mix up your glue/water mixture.  I used a 3:1 water to glue ratio and I think it worked perfectly on my plywood subfloor.  I mixed 6 cups of water with two 8-ounce bottles of glue in a bucket and stirred it until the glue was dissolved.  I assumed that I would have to make another batch, but it was just enough for my small bathroom.  I've read that half water and half glue works better for concrete floors, so do your research first depending on what type of floor you have!

Second step - start ripping and crumpling your paper.  You could make a whole pile of paper pieces ahead of time, but I liked ripping as I went... 


Next... Start dunking the crumpled up balls of paper into the glue mixture.  IMPORTANT! You only need to put them in the glue mixture for like, 2 seconds...just long enough to get them wet, and then take them out.  Otherwise they'll just turn to mush when you try to lay them out.  Also, you don't HAVE to crumple up the paper first, but it gives it a really cool, aged, leathery look to it because the stain seeps into the crinkles.  Love.


When you're ripping the paper, make sure it looks random.  The more shapes and sizes you have, the better it'll look.  The pieces with a flat edge worked perfectly along my bathtub and walls.  MAKE SURE that when you're laying down the pieces that they have a fair amount of overlap.  The more overlap, the more durable the floor will be in the long run.  Also, the paper is going to shrink a little when it dries, so overlap is important!

When I uncrumpled a piece of paper and smoothed it out onto the floor, I used a flat brush (in the picture above) to help smooth out the wrinkles and spread the glue mixture around.  The paper-laying part of this project was my favorite... It reminded me of paper mache or hodge podge projects I did as a kid. 

You'll notice that some of the pieces are darker than others in this photo... I didn't know that would happen and it's impossible to predict which pieces will be darker or lighter.  Each side of the contractor's paper had a different sheen to it, so it all depended on which side was facing up.  I love the way it turned out though...I think it made it more interesting.


After my floor was completely covered in brown paper, it was time for my least favorite task ever.  WAIT for it to dry.  I'm so incredibly impatient and this project required a lot of waiting.  Luckily, I had half a dozen other projects going on at the same time to distract me. 


A lot of blogs said the floor would be dry overnight, but that wasn't the case for me.  I think I waited about 24 (agonizing) hours for the floor to be bone dry... Next step: wood stain!  As I mentioned earlier, this step is optional.  You could poly right over the paper as-is, but I wanted a dark, rich color. 

Here I am using the chip brush around the edges.  Pardon the towel on my head... Oh, also... I removed the toilet (by myself, because I am Super Woman!!!) because I wanted the flooring to go underneath the toilet. 


Using my lambskin mop to apply the rest of the stain... One coat was plenty but make sure you spread it out reeeeeeally well.  Do not let any "pooling" happen.  A little goes a long way! 


It's important to use oil-based stain (based on everything I read, water-based stain doesn't work as well) and to let it dry COMPLETELY before you start applying the layers of poly.  I installed my floor three months ago (I'm way behind on my posts!), so it's hard for me to remember how long the stain took to dry, but I think it was about 24-36 hours.

Finally!  It's time to poly...  This is the most important step since the poly is what is protecting the longevity of your floor.  You will need to apply AT LEAST ten coats of poly, if not more.  This isn't as hard as you would think though.  The poly I bought was fast-drying, so I only had to wait about an hour in between each coat.  It still took me a couple of days to finish only because I had a million other things going on... I lost count of how many layers I did, but I think it was about a dozen.

I washed the lambskin block out really well after staining and reused it for the poly and I used the chip brush around the corners again... I found that just wearing socks to apply it worked best.


One random word of advice... Put your hair up while you're doing this!  I have long, dark hair and after the floor was totally done I found several hairs permanently embedded in the layers of poly.  I'm sure I'm the only one who will ever notice, but they still make me crazy...

After I was done with the floor, I figured out how to install new wood baseboards and quarter round trim (again, by myself, because I am awesome) and I think it looks GORGEOUS against the dark floor.  Along the bathtub and toilet I used bright white caulk to match the trim. 

The finished product....


Wow, that was a long post.  My brain hurts.  Next up...the big kitchen reveal.  Stay tuned!


Monday, August 26, 2013

I'm Back!

I haven’t posted anything on here in almost three months, because I’ve just been too ridiculously busy… If you follow my other blogs, then you know I just quit my day job to go back to school to study health and fitness.  I had to take a mega-hard writing class over the summer as a prerequisite before school starts in the fall, and it sucked up a huge chunk of my spare time… So, that combined with working full-time and remodeling the kitchen meant that I haven’t had any time to bore you with my do-it-yourself posts...

But, my writing class ended a week ago and my last day of work was on Friday…and I have FOUR whole weeks off before fall term starts.  I haven't had that much time off work since I was 14.  So I’ll be blasting through my never-ending to-do lists...including catching up on blog posts.

You can expect the following posts in the upcoming weeks:
  • My super awesome bathroom floor (done for less than 100 bucks)
  • My gorgeous kitchen counters (I did faux granite again and I love it even more than the bathroom)
  • My super top-secret kitchen shelving (only a handful of people have seen my kitchen so far and I won’t let them take any photos because I don’t want anyone to ruin the “big reveal”…. That’s normal, right?)
  • My pantry makeover
  • Another super easy tile blacksplash project

Notice the veins bulging out of my neck... It's been a stressful (but productive) summer!


I’m nearly done with my bathroom floor post…so, watch for it tonight or in the morning.  But first, time for a quick jog with my newest Health Monster client!!


Sunday, June 9, 2013

Tile Backsplash

I knew I wanted to add a tile backsplash to the bathroom to help the faux granite counter look a little more "high-end"...but I had no idea how I was going to accomplish it.  I know HOW to set tile, but I didn't have access to any of the tools I needed...most importantly, a tile saw.  I picked out a really pretty glass tile at Home Depot anyway... "I'll figure out how I'm gonna install it later."

Traditionally, tile is set using mud... You stir the dry mud mix with water in a bucket and then spread it on the wall using a trowel then set the tile in it.  It sounds simple, but the mixture has to be the perfect consistency and the whole process is just a goopy mess.  No thanks.  Plus, I didn't wanna spend money on a bunch of tools and stuff I would only use once with a lot of leftovers.  If only there was a simpler method.  Oh, wait...there is.

I Googled "tile backsplashes for dummies" (not joking) and I came across this brilliant invention called a tile setting mat.  It's basically like super sticky double-sided tape for tile.  You peel off the plastic backing, stick it to the wall and then stick your tile to it.  It doesn't get any easier than that!

I didn't read the instructions or warnings on the package about how and where to use this stuff (shocking, I know) but I would never use it in a shower or anywhere the weight of the tile was unsupported.  Meaning, I wouldn't let this sticky stuff be the ONLY thing defying gravity and holding the tile to the wall.  But that's just paranoid me.  It's probably capable of a lot more than I give it credit for, but I'll only know that for sure if I ever get around to reading the instructions...so, don't hold your breath.  The weight of my backsplash was being supported by the counter top itself, so I felt confident that this would work well...

I bought small, rectangular glass tiles in 12" x 12" sheets and then cut the mesh backing to create strips of tile in the height I wanted.  I totally screwed up the drywall when I ripped off the existing Formica "backsplash" so, I made it tall enough to cover up the mess... 

Note the tile setting mat on the right...it's clear, so it's kinda hard to see.  The tile I chose wasn't exactly light in weight, so it's definitely sticky...


Attaching the tile to the wall was the easy part...but now came my biggest problem.  I had no idea how I was gonna cut the tile to fit into the corners and around the edges.  I assumed I would have to fork over 40 bucks to rent a tile saw at Home Depot to make a half a dozen cuts, but not before I tried every other (totally unsafe) method of cutting the tile myself first.  I tried scoring the back of the tile with a razor knife and then breaking it with a chisel and hammer, but it totally shattered, as expected.  Hmmm...what else could I try?  Bingo!  I'll see if my dad has an angle grinder!  Which he did, of course...

If you don't know what an angle grinder is, it's a hand-held tile saw almost.  It has lots of non-tile uses, but it's a tool owned and heavily used by every tile setter in the country, if not the world.  It works well for making small tile cuts, which is exactly what I needed...

Beware though, glass tile chips off and shoots at your face when you cut it!  Here I am sporting sunglasses while cutting it to protect my peepers...


Cutting the tile was super easy and I was able to fill in the corners and gaps with no problem... Next up, grout. 

I did buy a grout float when I bought my tile, so I was actually prepared for this step.  A float is a tool used to press grout in between tiles.  You can buy dry grout and mix it with water yourself (a lot like the goopy, tile-setting mud) or you can buy it pre-mixed and ready to spread in a tub like this...


Since I have a million house-remodeling projects in the works right now, I happily opted for pre-mixed grout.  One less step for me.  I chose the color "Linen" which is a beige-y, neutral color.  It goes with almost everything.  (Don't ever buy white grout, you will regret it eventually.) I also bought tile caulk in the same color for around the edges, in the corners and along the counter.  Grout naturally shrinks, cracks and crumbles over time...the caulk keeps the grout looking like it did on day one. 

Spread and slather and push and mush the grout in EVERY single nook and cranny.  The tile will be mostly covered in grout and if it's really, really messy...that means you're doing it right.

Wahoo!!!  I actually remembered to take some "during" pictures!  Maybe I'm getting better at this...


After the tile is totally covered in grout, use a really big sponge and a bucket of clean water to wash it off.  The grout will stay in the grout lines, but it'll wash off the tile itself.  This part is gonna take some time and lots of washings.  Just keep wiping it down until the tile isn't cloudy anymore.  And then wipe it down one more time for good measure.  Make sure to get the grout off the walls as soon as possible, because grout is very gritty and it WILL remove the paint if you try to wash it off after it's dry.  I promise.


The grout will be totally dry in about 24 hours, but you'll need to wait at least 48 hours for the grout to cure before sealing it with grout sealer.  Sealer protects grout against stains and discoloration.  Don't skip this step!


The whole backsplash took me a total of 2 hours at the very most... It was super easy and I love the outcome.  It gives the bathroom a "richer" feel even though it only cost about 85 bucks... It would have cost less if I wasn't seduced by a sparkly, pretty glass tile that cost 14 dollars per square foot.  Oh well...money well spent, in my opinion.


Okay, break's over... Time to go mow the front lawn!


Saturday, June 8, 2013

Shower Makeover

We got our house keys on May 10th, but I didn't have to be out of my apartment until the 31st... It was a good thing too, because the shower was totally unusable in it's current state.  Not to mention disgusting.  It was riddled with holes left behind when someone removed handrails from the shower walls, the caulk was a cracking mess and the whole thing was just old and super gross.  

Shower before...


So, the first order of business was to replace the fiberglass shower surround before we actually started living in the house.  Welllllllllll, that was MUCH easier said than done. 

Luckily, my dad is super handy and knows everything about everything...because I wouldn't have had a clue how to tackle this project.  We ripped the existing shower surround out exposing the studs and the plumbing in the wall.  This is when it started getting fun. (Please note my sarcasm.)  My dad took the old shower fixtures off and when he removed some fitting or valve thing-a-ma-jig (I know absolutely nothing about plumbing) the faucet EXPLODED and water shot out at million miles an hour and I accidentally screamed at the top of my lungs.  Okay, okay...the "exploding" part is probably a bit of an exaggeration, but the screaming part isn't. 

I stood with both my hands on the gushing pipe trying to direct the water into the bathtub.  I was worried about it drenching the bare, plywood subfloor.  My dad RAAAAN outside in search of the water main shut off thingy while someone else started throwing buckets of water out the window because the tub wasn't draining fast enough and it was filling up quickly.  I can't make this stuff up.

After what seemed like a hundred hours, my dad finally found the shutoff but he had to dig through the dirt with his hands because it was buried underneath a big tree root.  Of course it was.  Meanwhile, back in the bathroom I was remaining totally calm and collected.  Oh, wait...I was completely drenched and having a full-blown panic attack.  That's right.

Long story, short...my dad got the water shut off, he worked a bunch of plumbing voodoo magic in the walls to get ready for the new surround and fixtures and then he installed everything.  That's about as technical as I can get.  We chose a surround intended for a standing shower (without the base) so the walls are very tall...almost to the ceiling.  It made the bathroom ceiling feel really high and I love the way it turned out.  Buttttttt, it had an unintended consequence. 

After....so purdy.


I installed my beautiful, curved, oil-rubbed bronze curtain rod above the shower and then realized... "Oh, crap.  My shower curtain won't be long enough!"  Shower curtains are typically about 72 inches long...and I now needed one that was 84 inches long.  I found this especially annoying considering my blue/brown/gray shower curtain was the color pallet inspiration for the entire bathroom.  Blarg.


I had the idea to add a panel of fabric to the bottom of the curtain to lengthen it, but I was worried it would look tacky and disjointed.  Light bulb!  Then I had an even better idea... I would cut the curtain towards the top and insert a panel of fabric in between two halves of the curtain...making it look more like one cohesive piece of fabric.  Of all my artistic/creative/handy talents, sewing is NOT one of them...so I convinced my mom to play seamstress for me.  She did an awesome job...

Next, I added a cream-colored ribbon along the seams to give it a more finished look.  My mom introduced me to Stitch Witchery which is basically a strip of fabric glue that is activated by heat... You just put a strip of Stitch Witchery in between the fabric and ribbon, put a damp towel over it and then iron it on.  Presto.  Instant trim. 


I hung it up this morning and I am in love with it.  I can't help but poke my head in the bathroom every time I walk by...  And the best part is, for less than 10 bucks I have an expensive-looking shower curtain!


Faux Granite Counter Top

Okay, the cabinets are done...next up, the counter.  I did a lot of research before we moved in because I knew I wanted to try and refurbish as many existing items as possible...not only to save money, but also because I love being clever and creative.  How many people do you know that handed over a fistful of cash for beautiful, granite counter tops?  That's right...everyone.  How many people do you know that paid 60 bucks for materials and MADE their own counters that look like this...in an hour.  Not many...  


Painting Formica is no new idea and I certainly don't claim it as one of my own brilliant brainstorms.  You can find tons of tutorials on YouTube or Pinterest and there are even several companies that make "faux granite" painting kits.  Rustoleum, Crystal Top Overlay and Giani Granite are the main ones I found.  I researched them all...comparing price, reviews, photos, videos and quality...and I ended up selecting the Giani Granite kit.  It had the best ratings and at 60 bucks it was a fraction of the price of the other options.  I even priced out the materials individually, but I still couldn't do it cheaper.  Giani has several color options, but I chose Sicilian Sand. 

The kit includes a black primer, 3 different colors of "mineral" paints (I assume they add minerals to give it a more realistic stone appearance?), a clear top coat, a mini roller and a big sea sponge...among a couple other items. They even include a lengthy how-to video that I watched twice (because I wasn't listening the first time through) and then I proceeded to just do whatever I wanted.  I'm not the best at following instructions simply because I'm terrible at paying attention... The video strongly suggest doing "practice sponging" on the black paper they provide to get your technique down, but being the impatient monster that I am, I skipped the practice step, rolled up my sleeves and dove right in...

Here are the counters before...gross.


First step:  Prep.  I hate prep.  I'm so impatient and easily bored and I just wanna hurry up and get to the finish line, but I know it's important so I force myself to do it...blah, blah.  I taped the areas around the counter that I didn't want to get messed up with FrogTape (I could and should write a whole post on FrogTape...it is ahhhhhmazing.)  The instructions say to use SOS or Brillo pads, but I had no idea where mine were packed, so I just scrubbed it really well with hot, soapy water and a dish sponge.  Chemical cleaners aren't recommended because of the residue they can leave behind.  I didn't have any nicks or gouges in my counter, but if you do, you can fill them with wood patch before you start painting...

Also, I was planning on replacing the sink and adding a tile blacksplash, so I ripped both of those out before I started so I didn't have to paint around them.  If you don't have the luxury of gutting your bathroom before painting your counters, just mask your sink off really well with FrogTape...not that blue painter's tape crap, only use FrogTape.  Trust me.

Second step:  Primer.  After the counter was bone dry, I rolled on one coat of black primer and waited 8 hours like I was supposed to.  The written instructions have like, 5 paragraphs on how to primer, but again...I hate reading instructions and this part isn't brain surgery.  So, I skimmed them, caught the highlights and went to town. It said that one coat of primer is enough, but the following day the primer got really dusty and ashy and mucked up from the drywall destruction going on in the shower (that's yet another post)...so I put down a second coat of primer and covered it in plastic after it was dry to protect it from the construction chaos...

Primered counter...and cutest puppy helper of all time.


Third step:  The fun part!  Again, after skimming the instructions, I cut the provided sea sponge into multiple sizes, poured my "mineral paints" onto Styrofoam plates and started dabbing.  The colors are numbered in the order you are supposed to use them in, so it's hard to screw it up...even for people like me. 

I dabbed all three paint layers on one small section of the counter at a time instead of sponging the entire counter with paint #1 and then paint #2, etc. This part is important!!!  If you've nodded off from reading this boring, informative post...wake up and pay attention to this part!  You want the first layer to still be wet when you start dabbing on the second layer because they'll sorta blend and merge...making it look more realistic.  I've seen photos of people who did it the other way and it reminded me of leopard print.  It wasn't pretty.  I also never rinsed out any of the sponges...I just kept dipping and double-dipping them in the paints and letting them do whatever they wanted.  To make it look as realistic as possible, I barely paid any attention to what I was doing. Granite isn't uniform...it's random.  So, just let go and let it happen! 

While dabbing, I kept rotating my wrist and using different sides of the sponge to prevent getting the same imprint over and over.  I even used my left hand part of the time so I couldn't control the pattern even if I wanted to.  I noticed that the wetter my sponge, the LESS I liked the outcome...it looked too fake.  So, I used the paints very sparingly and dabbed off the excess... I kept going back and forth in between the colors and when the counter was totally covered, I thought it looked too..."one note."  I had covered too much of the black primer up and it felt flat.  So, I busted open the primer again, and using my smallest sponge, I super lightly dabbed a little black back in here and there.  Presto!  Instant depth again. 

As soon as you're done sponging, you'll know it.  Just keep dabbing until you stand back and love it... The whole process took me less than an hour and I'm a super duper perfectionist.  It was actually a lot easier than I thought it was going to be.  After letting the paint dry for 4 hours, I lightly sanded it with super fine 600 grit sand paper to sand down any paint peaks made by the sponges...

I wish I would have remembered to take some "during" photos while painting, but I was so consumed with the creative process that I totally forgot.  I'm lame.  I also plan to paint my kitchen counters, so I'll update this post with more photos then...

After painting....


Last step:  Clear top coat.  This step is the most important and while doing my research, I read several reviews written by customers who hadn't really paid attention and sadly screwed up their top coat and the overall look of their counters.  So, I actually forced myself to thoroughly read the instructions for this step.  

Immediatly after rolling on a THIN layer of the top coat over a small area...place the roller at the back of the counter and super lightly roll back over it, pulling the roller towards you.  It's important to use ONE long, end-to-end, straight roll stroke.  Move onto the next section and do the same thing...  If you were to just roll back and forth the finish wouldn't look uniform and you'd be able to see the roller marks.  No bueno. 

After waiting the required 4 hours, I put on a second coat.  It says that three coats is the max, but being the stubborn, non-listener that I am, I put on 4 coats because it didn't feel protected enough to me.  I mean, this is a bathroom we're talking about... I can't speak for the longevity of this stuff yet, but it's been 3 weeks and so far I'm impressed...  I wipe down any water drops right away though, just as a precaution. 

I don't think the photos do the counter justice...they look WAY better in person.  I'm super happy with how they turned out and everyone who sees them says, "Those are painted?!?!" 

After photos...LOVE.


Holy crap, this was a really long, not-so-entertaining post... Enough blabbering, I gotta get back to work!


Friday, June 7, 2013

Bathroom Vanity Makeover

After many requests...here it is!  My bathroom tutorials.  Almost every surface in the bathroom has been redone, but these are a few of my cleverest projects:

 - I painted the baby blue Formica counter top to resemble granite using a big sea sponge
 - I installed a glass tile blacksplash (for my first time!) without using mud or a tile saw
 - The flooring now consists of ripped up brown paper and Elmer's Glue (um, what????)

Okay... So, after I ripped every hideous object out of the bathroom, I attacked the vanity first.  I deglossed all the cabinet doors, drawer fronts and the cabinet itself so I could paint over the boring, 80's-style oak.  If you don't know what deglosser is, let me tell you...it is magical.  I hate sanding.  Everyone does.  I buy this kind from Home Depot, for like 8 bucks.  I would happily pay twice that to avoid sanding.  All you have to do is take an old rag, douse it with some deglosser and start scrubbing and rubbing.  Then wait until it dries (about 15 minutes or so) and do a second coat.  Degloss every surface you intend to paint...so, if that includes the inside too, keep scrubbing.  

You'll need to put a little muscle into it for the deglosser to work well, but it still beats sanding and paint remover and stripping varnish and other tasks that requires the patience I do NOT possess.  It not only takes off grease and dust and oil and 50 years worth of grime, but, most importantly, it takes off the glossy finish from the wood stain making it porous again...and paintable.  If you were to skip this step and just painted over the wood stain, it wouldn't stick well and then the first time your 3-year-old climbed up the cabinet to brush his teeth (do 3 year-olds do that?  I actually have no clue...) the paint would scratch off because it wouldn't have soaked into the wood at all... 

As I mentioned in a previous bathroom post, I painted the cabinet dark blu-ish gray, decided I hated it and then repainted the entire thing chocolate brown.  I used Behr paint for the whole bathroom.  I only ever use Behr paint and I buy it with the primer already mixed in.  It, too, is magical.  The exact color I used is "Dark Truffle."  Oooooh, I want some dark chocolate now... 

Before and after cabinets...pardon the mess.


The only thing I have left to do to the vanity is to add hardware to the drawers and such... I don't know why, but that has turned into an annoying to-do that I can't seem to make myself accomplish.  It's tedious and I'm impatient, but it'll get done...eventually.

Next up...the counters.  Wait, I just decided to break this tutorial into separate posts otherwise it will be monster-sized...keep reading for my Faux Granite Counter top tutorial!