But I still hated it. Damn. Now the cabinet jutted too far out into the living room. It just looked like an oddly placed piece of furniture. Like when you walk into a business and the front desk is blocking you from entering. And if this wasn't attached to the wall I would never in a million years put it there. Grrrrrr. So, I decided to break some more stuff...and to shorten it from three cabinets to two. Like this...
This task proved harder than taking off the entire top. And it nearly broke my nose. Like, I seriously almost drove myself to the emergency room. It's a long story. Moving on.
Because the top and several other parts of the cabinet were made of long, solid pieces of wood I literally had to CHOP the third cabinet off. I pried the quarter round trim off first to make sure that there was even hardwood underneath...which there was...so I got to work.
I was able to get the back, side and shelf pieces off no problem... But the top and bottom were connected to the rest of the cabinet, and I ended up using three types of saws to get it off. It was a huge pain and took forever. But, as always, I won!
I cut the quarter round trim to size and reused it... And I also reused the backing to recover the top and side since they were totally mangled during the demolition.
Then I primered, caulked and painted the crap out of it. And I added contact paper to the shelves, because there was NO WAY I was gonna paint the inside of it too. Real wood soaks up paint like the desert soaks up water. It took two coats of primer and 2-3 coats of paint to cover this bad boy...
Finally, I reused the tacky gold hinges by spray painting them oil-rubbed bronze and splurged for pretty, faux crystal, vintage-looking knobs.
Before I could paint the dining room, I had to repair the bare sheetrock where the cabinet had been.... Which meant spackling, patching, texturing, etc. And I also had to patch, primer and paint the ceiling...and sand, stain and poly the bare hardwood floor where the cabinet had been. Compared to the rest of this project, these were the easiest tasks....
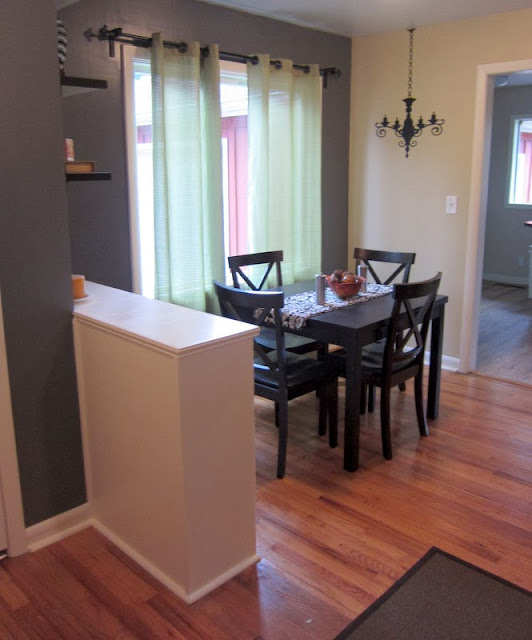
Now the best part....after pictures!!! I painted the walls a dark grey and added shelves I had lying around above the cabinet.
They vinyl chandelier and "Happy Halloween" sign are from Welcome Home Vinyl which is my mama's vinyl business! I traded her a haircut for it (another one of my random talents) but you can purchase one (or many other super cute items) from her website!
In total, I only spent about 80 bucks on the entire dining room because I reused a lot of materials and other stuff I had on hand. Next up...the living room reveal.
This task proved harder than taking off the entire top. And it nearly broke my nose. Like, I seriously almost drove myself to the emergency room. It's a long story. Moving on.
Because the top and several other parts of the cabinet were made of long, solid pieces of wood I literally had to CHOP the third cabinet off. I pried the quarter round trim off first to make sure that there was even hardwood underneath...which there was...so I got to work.
I was able to get the back, side and shelf pieces off no problem... But the top and bottom were connected to the rest of the cabinet, and I ended up using three types of saws to get it off. It was a huge pain and took forever. But, as always, I won!
I cut the quarter round trim to size and reused it... And I also reused the backing to recover the top and side since they were totally mangled during the demolition.
What a mess...
Next, I trimmed around the top and down the sides to disguise the fact that it used to be a totally different cabinet. Never mind the dumbbells. What the heck did I use Elmer's glue for? It's all a blur....
Then I primered, caulked and painted the crap out of it. And I added contact paper to the shelves, because there was NO WAY I was gonna paint the inside of it too. Real wood soaks up paint like the desert soaks up water. It took two coats of primer and 2-3 coats of paint to cover this bad boy...
Finally, I reused the tacky gold hinges by spray painting them oil-rubbed bronze and splurged for pretty, faux crystal, vintage-looking knobs.
Before I could paint the dining room, I had to repair the bare sheetrock where the cabinet had been.... Which meant spackling, patching, texturing, etc. And I also had to patch, primer and paint the ceiling...and sand, stain and poly the bare hardwood floor where the cabinet had been. Compared to the rest of this project, these were the easiest tasks....
Now the best part....after pictures!!! I painted the walls a dark grey and added shelves I had lying around above the cabinet.
They vinyl chandelier and "Happy Halloween" sign are from Welcome Home Vinyl which is my mama's vinyl business! I traded her a haircut for it (another one of my random talents) but you can purchase one (or many other super cute items) from her website!
In total, I only spent about 80 bucks on the entire dining room because I reused a lot of materials and other stuff I had on hand. Next up...the living room reveal.


.JPG)
.JPG)
.JPG)
.JPG)


.JPG)
.JPG)
.JPG)
.JPG)


.JPG)
.JPG)
.JPG)
.JPG)


